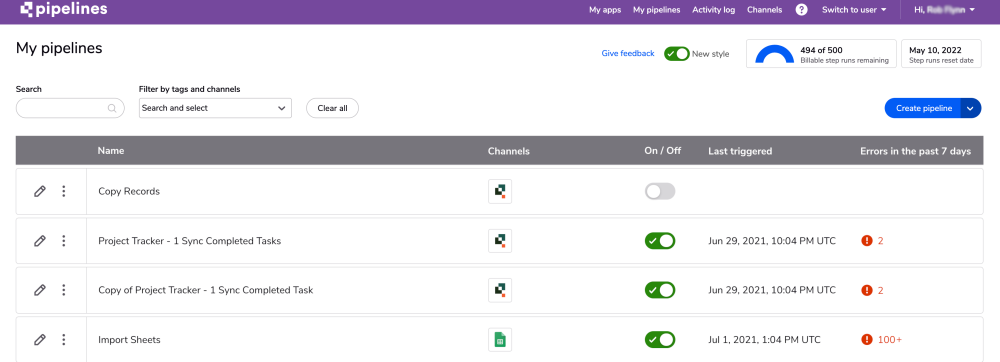
About the My pipelines page
The My pipelines page provides an at-a-glance look at all your pipelines. For example:
New in on My Pipelines
Using My pipelines
From the My pipelines page you can:
Your pipelines are displayed with the last modified first.
- View information on all your pipelines, including name, description, whether the pipeline is turned on or off, when the pipeline was created, and when it was last triggered.
- Access important links to view the recent activity of your pipelines or to edit and schedule them.
- View information on your pipeline usage and statistics.
From the more icon  in each pipeline listing you can:
- Select Export to export the pipeline as a YAML file. For more information about YAML and pipelines, see About YAML.
- Select Duplicate to create a copy of the pipeline.
- Select View activity to view the run activity of the pipeline
- Select Delete to delete the pipeline.
- Select Schedule to edit your existing schedule or add a new schedule.
Pipeline details
If you click on the pipeline name, this opens the Pipeline details panel where you can see:
Name - The name of your pipeline.
Description - The description of your pipeline.
Pipeline ID - The unique ID of your pipeline.
Date Created - The date the pipeline was created.
(If the pipeline is scheduled) Schedule - This is the schedule frequency set for the pipeline.
(If the pipeline is scheduled) Next run - This is the date time (in UTC) of the expected next runtime based on the schedule set for the pipeline.
Tags (see below for details) - The list of tags set for your pipeline.
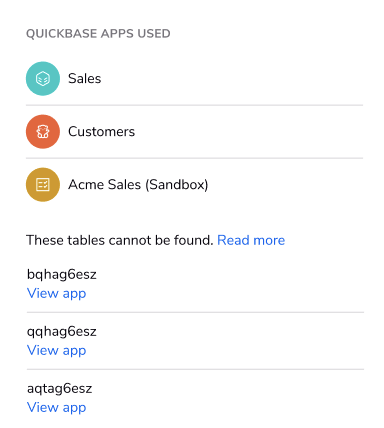
QUICKBASE APPS USED
QUICKBASE APPS USED shows app information for any table used with Quickbase Channel Records, Bulk Records, and Attachment steps. If a table is not part of the current realm, or if the table has been deleted, we display the dbid that’s being used in your pipeline with a link so you can find more information about that table. For example:
Tagging
You can add tags to each pipeline when you create them or edit them. Tags can help you keep your pipelines organized and make them easier to locate. Look for the Tags field:
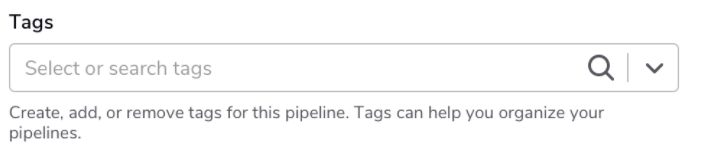
To create a tag, start typing into the Tags input, and you should see an option to 'Create' the tag with the provided text. You are allowed to create up to 30 tags, and each pipeline can have up to 10 tags associated with it.
Statistics
Click on your list of pipelines to open the information panel. Click the Statistics tab to view the statistics for the pipeline. The statistics displayed are:
- Last run date - This is the last time the pipeline was triggered/started.
- Total step runs - This is the total number of step runs (inclusive of free & billed) for the pipeline over the past 30 days and a comparison to the previous 30 days (cached for 24hrs).
- Billable step runs - This is the total number of billable step runs used for the pipeline over the past 30 days and a comparison to the previous 30 days (cached for 24hrs).
For more information about how steps are billed, see Billing definitions.
Searching and Filtering
Use the search and filter features to locate pipelines.
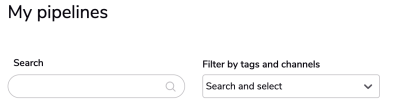
You can filter your list of pipelines by using a search text, as well as filter by your Tags or Channels used within your pipelines.
When you enter tags and channels in the Filter field, your entries are added together. That means if you filter by the tags "red" and "blue," you will only see pipelines with both of those tags. Search entries work the same way, with each entry added together in the search.
Sorting
Click on the Name column to switch between ascending, descending, or by the default, which is the last modified date of the pipeline. Click on the On / Off column to switch between On pipleline and Off pipelines.