About the Autodesk channel
Autodesk is a design software company that serves customers across the manufacturing, architecture, building, construction, media, and entertainment industries.
How to connect
-
On the My pipelines page, click Create pipelines. Enter name, description, and tag fields and click the Create Pipelines button. The pipelines wizard displays:

- From the wizard you choose the connections for the first steps of your pipeline. When you choose a type, you'll add the channels and steps for your first steps. You can always add more steps later. A Triggered pipeline is started by a specific event in real-time. A Scheduled pipeline will start according to a schedule. A Manual pipeline only starts manually. Once you've completed the wizard, you'll be prompted for connection detail, if necessary. If you are an experienced builder, click the Start from scratch button and then from the right side of the page, choose the All to list all available channels.
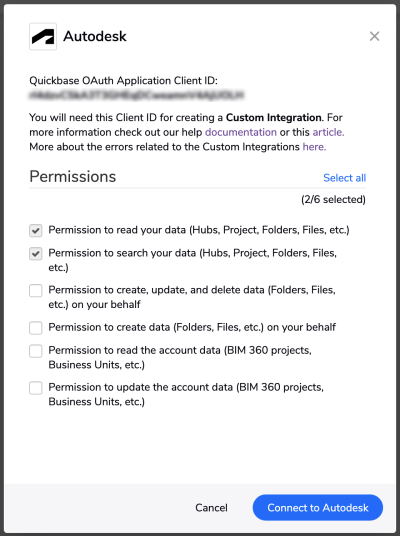
- Expand Autodesk and click Connect to Autodesk:

- The permissions window displays. At the top of the window Quickbase OAuth Application Client ID displays. Save this Client ID somewhere because you will need it in the next steps. Then you will have to specify a set of permissions (scopes) that Pipelines will receive once connected. Read and search permissions are required.
When finished, click Connect to Autodesk.
- The Autodesk login page displays.

- After you log in, click on the Allow button to authorize Pipelines.

- After your successful authorization you will be able to see all of the Autodesk resources.
EMEA vs US based accounts (Access restrictions)
You need to make one more configurations before you can work with the Autodesk channel successfully. Start by creating a new Custom Integration from the BIM360 Platform.
You can find more information about the Custom Integrations here:
Steps to create a new Custom Integration
Follow these steps to create a new Custom Integration.
- Go to https://admin.b360.autodesk.com/ and sign in
- Go to Account Admin → Settings → Custom Integrations → Add Custom Integration

- Add Custom Integration displays - click Next.

- Click on I’m the developer and then Next.

- Fill the form below:
- Select the checkbox with label I have saved the Account ID information securely
- In the Forge Client ID field paste the Quickbase OAuth Application Client ID that you copied from the connect form in the previous section
- Enter a name for your App in the App Name field and click Save.
How to reconnect the Autodesk channel
You may need to reconnect your account to a channel. Reasons may be (but not limited to):
-
If you need to connect a different account.
-
Authorization updates, such as a changed password.
-
Editing the access rights that Pipelines has to the channel.
To reconnect:
- Select a pipeline that already has Autodesk in it.
- Open a step containing Autodesk.
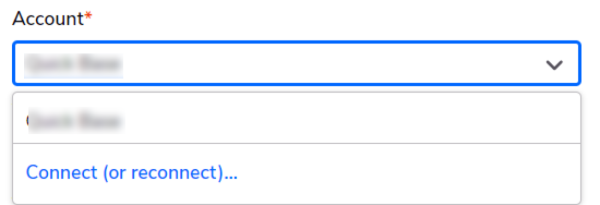
- Under account, select Connect (or reconnect) and follow the process above, How to connect.
Steps
The steps you can use with Autodesk fall into a four categories: Hubs, Projects, Folders, and Items.
| Type | Name | Description | Limit (requests/minute) |
|---|---|---|---|
| Hubs | |||
| Query | Search Hubs | Searches all Hubs based on search criteria. | 300 |
| Action | Look Up a Hub | Looks up a Hub by Hub ID. | 300 |
| Projects | |||
| Query | Search Projects | Searches all Projects based on search criteria. | 300 |
| Action | Look Up a Project | Looks up a Project by Project ID. | 300 |
| Folders | |||
| Action | Create Folder | Creates a new folder in the chosen parent folder by Absolute Path or ID. | 300 |
| Action | Update Folder Name | Updates a Folder Name | 50 |
| Action | Look Up a Folder | Looks up a Folder by given ID or Absolute Path. | 300 |
| Items | |||
| Query | Search Items | Searches all Items based on search criteria. | 300 |
| Query | Search Item Versions | Searches all Versions of an Item based on given Item ID. | 300 |
| Action | Look Up an Item | Looks up an Item by Item ID. | 300 |
| Action | Upload an Item | Uploads an Item by given Hub, Project and Folder ID. | 50 |
| Action | Update an Item | Updates an Item by given target Item. | 50 |
Use cases
Here are some use case examples to help you understand how to use the Autodesk channel.
Upload an Item
The idea of the first use case is that you have a table in Quickbase with some file records. On adding a record in this table (on uploading a file in this table), the file will be uploaded in Autodesk and the record in the Quickbase table will be updated with some extra information about the file.
First you have to create a Quickbase table for uploading files with the following columns:
- Document (file name)
- Webview
- File Upload ID
- File Attachment (file itself)
- Upload document to Autodesk (checkbox)
- Folder ID
- Project ID
- Object ID
Create a new pipeline and connect your Autodesk and Quickbase channels.
-
-
The first step to be added is Record Created from the Quickbase channel. This step would be triggered whenever a record is added to the QB table. The record should contain values only for the Document, File Attachment and Upload document to Autodesk fields. All of the other fields will be automatically filled after running the Pipeline.

-
The second step to be added is Upload an Item from the Autodesk channel. Fill in the required information and add a file name for the item together with its file extension.

-
Drag and drop the Update Record step. Fill in the record fields with information for the Item taken from Autodesk.

-
After triggering the pipeline the record in your Quickbase table will be updated with the extra information about the newly added file.
-
Update an Item
The idea of the second use case is that you have a Quickbase table with Autodesk Item versions, where we are adding a new record for every update of the current item version in Autodesk.
First you have to create a Quickbase table containing the following columns:
- Display Name
- Version
- Webview
-
Create a new pipeline and connect your Autodesk and Quickbase channels.
-
The first step to be added is Look up a Folder from the Autodesk channel. Fill in the required information and specify the absolute path to the folder you would like to look up. You can also look up the Folder by its ID.

-
For the second step, add is Look up an Item from Autodesk. Specify the Item ID and if you would like to see it's custom attributes in the response, complete the Folder ID field.

Drag and drop the Update an Item step and fill in the URL of the new version of the Item. You can also update its file name and custom attributes.

-
Add a Create Record step. Complete the record fields with information for the Item taken from the previous step.

-
After triggering the pipeline, a new record with information about the updated Item version will be added to your Quickbase table.