About the Microsoft SharePoint channel
Microsoft SharePoint is a cloud content management and file sharing service for businesses.
Please note that terms used in the SharePoint channel categories are SharePoint specific terminology.
How to connect
-
On the My pipelines page, click Create pipelines. Enter name, description, and tag fields and click the Create Pipelines button. The pipelines wizard displays:

- From the wizard you choose the connections for the first steps of your pipeline. When you choose a type, you'll add the channels and steps for your first steps. You can always add more steps later. A Triggered pipeline is started by a specific event in real-time. A Scheduled pipeline will start according to a schedule. A Manual pipeline only starts manually. Once you've completed the wizard, you'll be prompted for connection detail, if necessary. If you are an experienced builder, click the Start from scratch button and then from the right side of the page, choose the All to list all available channels.
- Expand SharePoint in the list of channels on the right side of the page and click Connect.
- In the pop-up window, enter your company's subdomain information. Also review the permissions listed and make the appropriate selections. When finished, click Connect.
Note: The Read permission is default checked and locked. Depending on the permissions granted, integration and functionality will be affected. If you want to access files and folders you will need to select the read privilege. If you want to write to them you select the read and write privilege.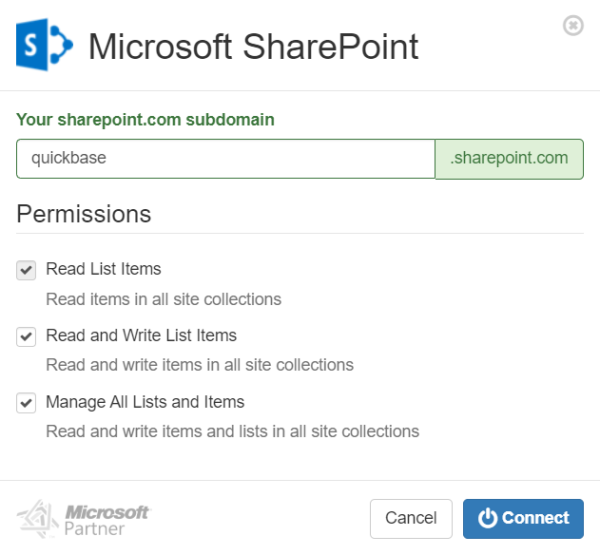
Note: These are the read permissions are required for these uses:
Files -OnCreate,LookUp,Search,List,FetchLink
Folders -Search,LookUp,List,FetchLink
read-write permissions are required for these uses:
Files -Upload,Move,Delete
Folders -Move,Delete,Create - Account sign in:
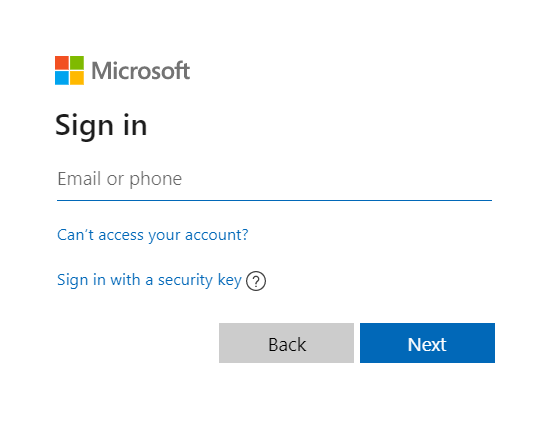
Note: You may need to approve any new sign in with multifactor authentication.- If you are not already signed in to Microsoft, enter your credentials and sign in.
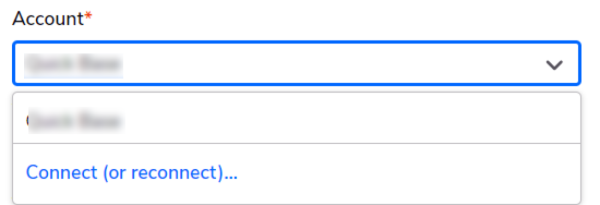
- If you are already signed in, select your account.

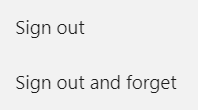
- If you want to sign out of the account shown, use the three stacked-dots to the right and select the appropriate option. Then sign in with the correct account.
- If you want to add an account, select the Use another account option and enter the credentials.
- If you are not already signed in to Microsoft, enter your credentials and sign in.
- Click Accept to allow Pipelines to connect to Microsoft SharePoint.
How to reconnect the SharePoint channel
You may need to reconnect your account to a channel. Reasons may be (but not limited to):
-
If you need to connect a different account.
-
Authorization updates, such as a changed password.
-
Editing the access rights that Pipelines has to the channel.
To reconnect:
- Select a pipeline that already has SharePoint in it.
- Open a step containing SharePoint.
- Under account, select Connect (or reconnect) and follow the process above, How to connect.
Steps
The steps you can use with SharePoint fall into a four categories: Items, Lists, Files and Folders.
| Type | Name | Description |
|---|---|---|
| Items | ||
| Trigger | Item Created |
Initiates when a new item is created. |
| Trigger | Item Updated | Initiates when an items is updated. |
| Action | Create an Item | Creates a new item. |
| Action | Update an Item | Updates an existing item. |
| Action | Delete an Item | Deletes an existing item. |
| Query | Search Items | Searches all items based on search criteria. |
| Action | Fetch a Linked Item | Fetches a linked item. |
| Action | Look up an Item | Looks up an item based on search criteria. |
| Lists | ||
| Action | Create a List | Creates a new list. |
| Query | Search Lists | Searches existing lists and returns a list of matches. |
| Files | ||
| Trigger | File Added | Adds a file. |
| Action | Upload a File | Uploads a file. The limit for uploading a file is 32MB. |
| Action | Delete a File | Deletes a file. |
| Action | Move a File | Moves a file. |
| Action | Look Up a File | Looks up a file based on search criteria. |
| Action | Fetch a Linked File | Fetches a linked file. |
| Query | List Files in Folder | Lists the files in a specified folder. |
| Query | Search Files | Searches for a file based on search criteria. |
| Folders | ||
| Action | Create a Folder | Creates a new folder. |
| Action | Delete a Folder | Deletes a folder. |
| Action | Move a Folder | Moves a specified folder. |
| Action | Look Up a Folder | Looks up a folder based on search criteria. |
| Action | Fetch a Linked Folder | Fetches a linked folder. |
| Query | List Children | Lists children of a folder based on search criteria. |
| Query | Search Folders | Searches folders. |
Site Permission settings
Some accounts might have issues with the site permissions and might not be able to use this channel properly.
To fix this follow the steps described below.
- Go to https://{your-sub-domain}.sharepoint.com/
-
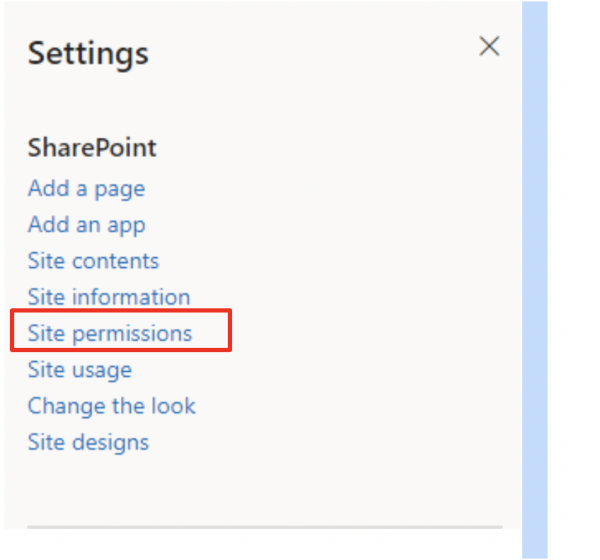
Click on the settings icon

-
Click on Site Permissions
-
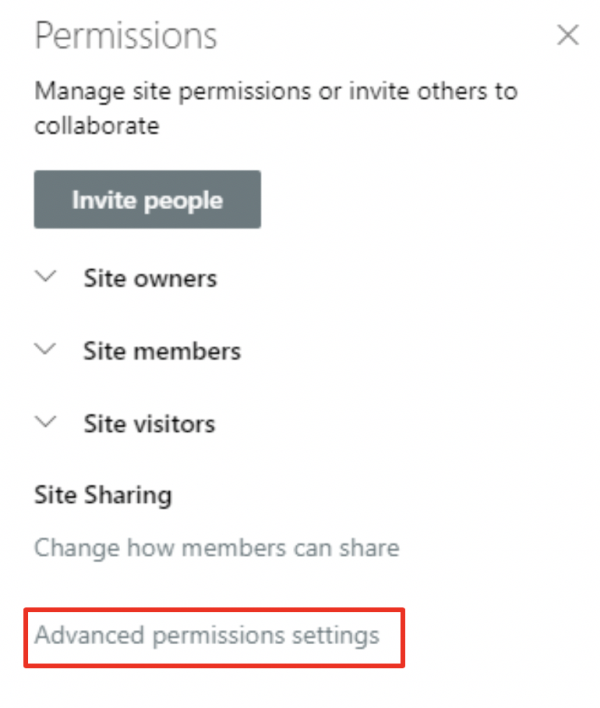
Click on Advanced permissions settings
-
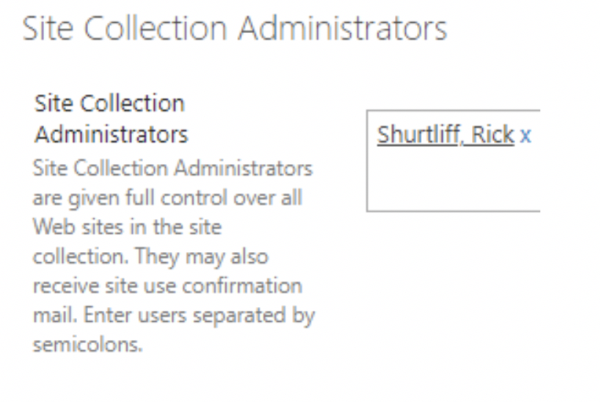
Click on Site Collection Administrators

-
Add the user credentials that you authorized through Pipelines
- The site will now show up in the Site Relative URL section in pipelines.
Use case examples
The following are some examples of using the Microsoft SharePoint channel.
Use the Bucket Channel to Schedule an Archive to Microsoft SharePoint
In this example we create a temporary CSV table to archive data from Quickbase to Microsoft SharePoint on a monthly schedule.
Step A: Define Your Table Using the Bucket Channel
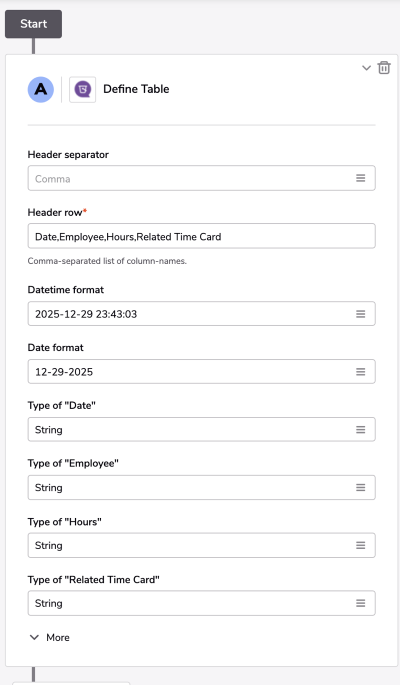
- Locate the Bucket Channel > Pipelines Rows > Define Table. Drag this Action to the first step of your Pipeline.
- Determine your table Header Separator. In this example, we use Comma.
- Define your header rows. These will correspond to fields in Quick Base in later steps. For my example, I'm archiving Time Cards. I want a Date, Employee, Hours, and Related Time Card as my headers. Which should look as follows: Date,Employee,Hours,Related Time Card
- Determine the Date and DateTime Formats.
- Define the type of field needed for each column. In this example it is fine to leave all columns as String.
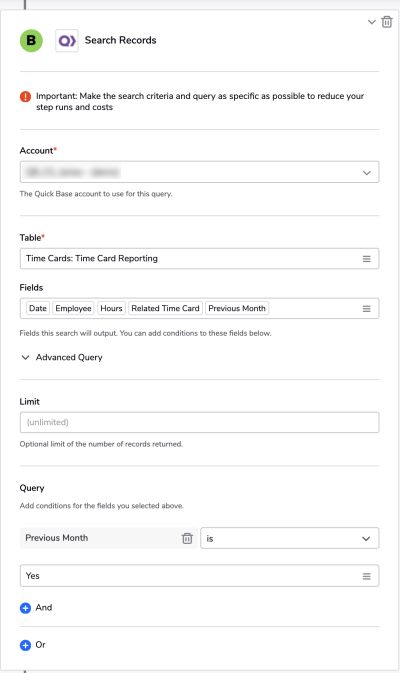
Step B: Search Your Quick Base table
- Go to the Quickbase Channel > Records > Search Record. Drag this Step below Step A.
- We select the Table we want to search for records.
- We select all the fields from the table that we will need in upcoming steps: Date, Employee, Hours, Related Time Card. We also create a formula check box for "Previous Month" to use as a query.
- (optional) Create a query for your records so we're only archiving the data we need. In my example, we're saying when the Previous Month is Yes (true/checked).
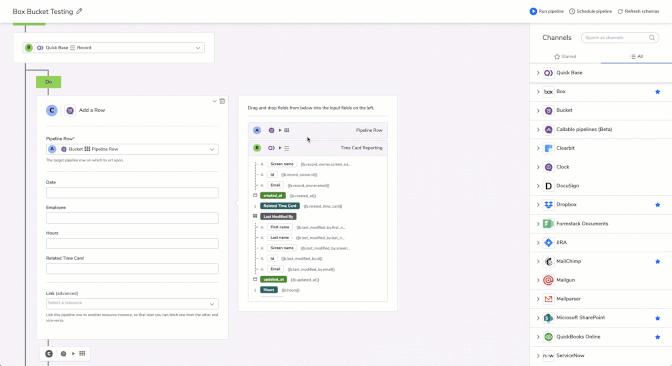
Step C: Add a Row for each record returned from Step B.
- Go to Bucket Channel > Pipelines Rows > Add a Row and drag this step under For each Record Do for Step B.
- Select Step A where it says Pipeline Row. This will then populate our fields defined for each column in your spreadsheet: Date, Employee, Hours, Related Time Card.
- Drag the appropriate fields from Step B to their Corresponding columns.
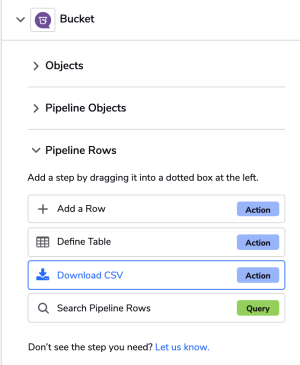
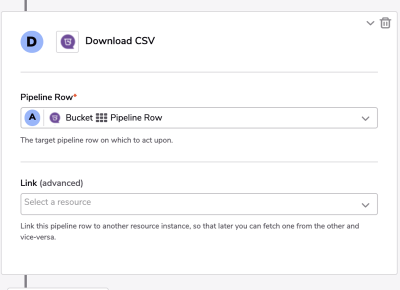
Step D: Download CSV
- Go to Bucket Channel > Pipeline Rows > Download CSV and drag this step below Step B.
- Select Step A, in the area for "Pipeline Row".
Step E: Upload File in Microsoft SharePoint
- Go to Microsoft SharePoint channel > Files > Upload File In and drag this step below Step D.
- Determine the Site Rrelative URL.
- Determine the Folder Path needed. In this example we will be uploading to a folder we titled QB. Our folder path should look like: All Files/QB
- Drag the download URL object from Step D to the Source URL in Step E.
- Name your file. In this example we want the File name to be the date the upload was made. To do this we'll use a date/time conversion to return todays date and append with .csv., for example:
{{time.now|date_mdy}}.csv
Final Step: Schedule your Pipeline!
In the upper right corner of our screen locate Schedule pipeline. From here we can set the pipeline to run on the 1st of every Month.