About Custom Forms
When a user wants to add, edit or display a record, they use a form. A form is a display of a single record. (See a sample form.)
When you create a new table, Quickbase automatically creates three built-in forms for the table:
-
View Form appears when a user views a single record.
-
Edit Form appears when a user edits an existing record.
-
Add Form appears when a user creates a new record and features blank fields, which a user can fill out.
In addition to these built-in forms, you may want to create a custom form that has exactly the fields you want, in the order you prefer. You may also want a different form for managers and employees.
Form content also might depend upon the choices that a viewer's already made in one field. For example, if an employee chooses "Sales" as their department, you want Quickbase to automatically display the Commission field and automatically populate the Supervisor field with the name of the sales manager.
Tip: If users will be accessing the application on mobile devices, such as smart phones or tablets, read tips for making mobile-friendly forms.
What you can do with a custom form
You can create as many custom forms as you want for each table in your app, unless your account is on the Quickbase Essential plan, which only allows one form per table. Create a different form for viewing, adding or editing a record, as well as one for each saved report in your application and/or each role, if you want.
By creating a custom form, you can:
-
Specify which fields appear in your form and where. Select only the fields you want and set their order.
-
Associate a form with a role. Create different forms for different roles. For example, users in the Administrator role may need to see a different form than those in the Participant role. (Note that forms using tabs cannot be selected for mobile use.)
-
Make some fields required. There may be times when you want a field to be required on one specific form only. For example, supervisors approving a reimbursement request may need to enter their Department number for budgeting purposes.
-
Add formatting elements. Add tabs, section headings, horizontal rules, explanatory text, and HTML tags to link to other pages.
-
Embed reports from related tables. When you display a project record, wouldn't it be nice to see all the tasks related to that project? You can embed a table of related tasks on a form. You can even set parameters for which detail records display. Show only open tasks. Or display only those tasks belonging to the current user.
-
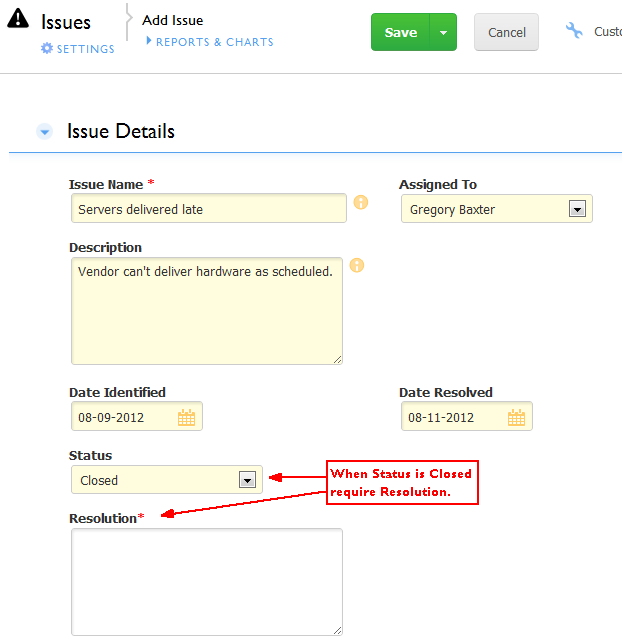
Set dynamic form rules. When you create dynamic form rules, your form can react to user input. For example, when a user selects a checkbox called Completed, Quickbase canautomatically fill out the Date Completed field with today's date. Or, when a user changes the issue's status to closed have Quickbase require the field called Resolution (see image below).
-
Show live dynamic Formula and Lookup fields. The value that a formula field displays is based on the values in other fields in the record. Only after a user enters values in each field that the formula references, can a formula field calculate its own value. For example, if you have a formula field which calculates a Finish Date based upon what a user enters in the Start Date and Duration fields. Once a user enters a value in both fields then tabs away or clicks in another field, Quickbase displays the resulting value in the Finish Date field. If you're editing an existing record, Quickbase lets you know that the formula field is recalculating by displaying a temporary strikethrough of the value (
which looks like this) before the field shows the updated value.
What a user sees
When you fill out a dynamic form, fields you complete or click away from appear in yellow (see the image below). This indicates that the field contains a different value than it did when you opened the form (change it back and the color disappears). As a result of an edit—and depending on what rules apply to the form—additional fields may display or be completed automatically by Quickbase. If a rule decrees, messages may also appear, either when you enter certain information, or if you try to save without completing a field that the rule requires.
When you complete
fields, they appear in yellow. Fields that Quickbase calculates
as a result of
your entries also appear in yellow). This form has a rule behind it. When Status
is Closed,
you must fill out the Resolution
field. The red asterisk next to Resolution indicates
that
it's required. This asterisk appears only after you select
Closed from the Status dropdown.
