Adding new tables
You can create new tables to track additional data in Quickbase by:
-
Building a table from scratch. Build a table by adding fields for the data you want to track
-
Connecting to data in a cloud app. Create a table by pulling in data from other cloud apps, like QuickBooks Online or Zuora. See About connected tables. Connected tables are not available to accounts on the Quickbase Essential plan.
Tip: Do you have an existing field (or fields) that you want to turn into a table? You can do so in a snap! Read how.
To create a new table from scratch
You can add a new table by using the New Table option in your app, or by using Visual Builder.
Using the New Table option
-
From the My apps page, open the app to which you want to add a table.
-
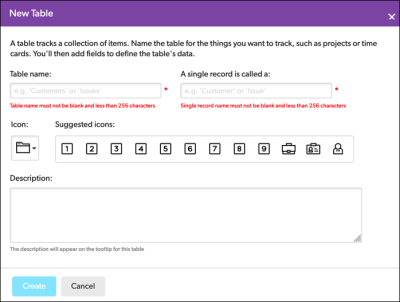
Click New Table and select From scratch. The New Table dialog appears:
-
Enter a name for the table, for example, Customers. This name will display in the table bar.
-
Enter a term to use for a record in the table, for example, Customer.
Tip: When adding tables to an app, don't use a term for a single record that you already used in an existing table. Make the term unique for each table you add so that your users aren't confused when they try to add a record. If have a duplicate term or one you don't like, you can easily change it. Read more.
-
If you don't like the icon chosen to represent the table, choose an icon from the Suggested icons field. If none of the suggested icons are suitable, click the Icon field to choose another icon. This icon will display along with the table name in the table bar.
-
Enter a description for the table. This description will display as hover text when you hover your mouse over the table name or icon in the table bar.
-
Click Create. Your new table opens for customization.
Note: At this point, your new table is just a shell—it contains only built-in fields, and default forms and reports.
-
Customize the table to suit your needs. You can add fields, set access permissions for all roles, create new reports and forms, and set up automatic email, among other things.
Using the Visual Builder
-
From the My apps page, open the app to which you want to add a table.
-
Click Settings, then click Structure. Your app opens in Visual Builder.
-
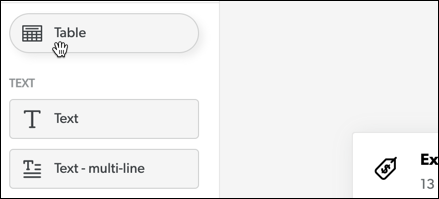
Use the left column to drag and drop a new table onto the canvas, which adds a new table into your app:
-
Use Visual Builder to add fields to your new table, or add table-to-table relationships, then click Exit when you’re finished. All changes are saved automatically.
To create a new connected table
-
From the My apps page, open the app to which you want to add a table.
-
Click New Table and then select Using data connection.
-
Create the table as usual – name it and choose an icon.
-
Select the service you want to connect to and enter the information required for Quickbase to connect to your data – usually your user name and password.
-
Select the data that you want to add to your table and then click Next.
-
Optionally select a filter, then choose your refresh options and click Done. The home page of the new connected table displays.
See Adding a connected table for more info.
