Welcome to Quickbase
Congratulations on signing up for a Quickbase account!
Before you dive in, there are a few things you should know about your new account and how things work in Quickbase.
What you get with Quickbase
You now have access to Quickbase - a Web site that lets you select, customize, and share online applications with your workgroup.
You and your colleagues can create and use applications, up to the limit described in your plan. Quickbase charges you a base monthly fee per user, and each plan requires a certain minimum number of users. If you have more users, you pay an additional monthly fee for each one. Your account accumulates a user only through access to an application. When you or any application manager grants someone access to an application, that person becomes a user that counts toward your account. If a user can access an application, they are automatically a member of the billing account in which the application lives.
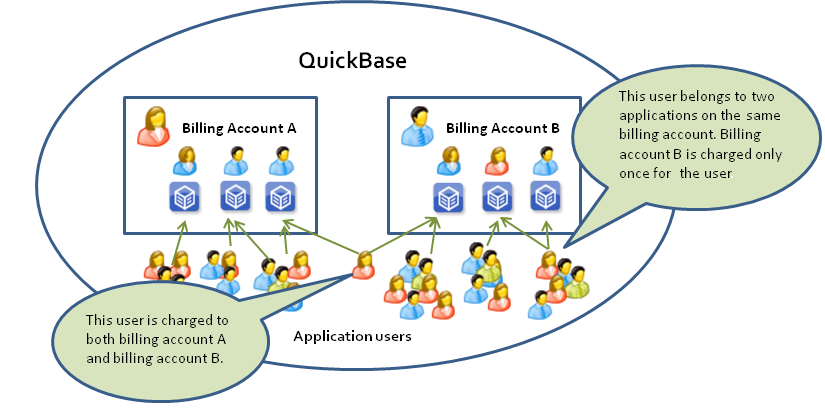
It's possible for a user to be a member of multiple billing accounts. Imagine that your company uses Quickbase to manage its consulting business. Say that your lead consultant, is a regular user of your Quickbase applications and you pay so they can access data in your account. As part of her consulting duties, Gertie also has access to an application in your client's Quickbase account. Because Gertie is a user of an application in their account, that client also pays so Gertie can access their information. (See image below.)
FAQ - What if a user accesses three applications in my account? Would I be billed for three users?
No, you'll be charged only once for that user, no matter how many applications they access.
 '
'
Accounts pay for each user who has access to an application in the account.
You can read more about managing account users in a minute. First, access your Quickbase account. To visit the Quickbase site, click the Sign In link at the top of the page and sign in to Quickbase.
When you sign in, the My Apps page appears. This is your personal My Apps page, and it shows a list of applications that you have visited. These applications may be part of your billing account or belong to another account. You may have access to applications that don't appear on this list because you have never visited them. (To search for an application, click the Adv. Search link.) You can find more information about an app by hovering your mouse over the app that you want to learn about. A popup appears, showing basic information about the application, like who the manager is and what account owns the content. Learn more about the My Apps page.
Preliminary Account Setup
Before you and your colleagues start inviting other users to use your applications, visit the Edit Account Properties page and make some fundamental decisions about your account.
To access the Account Properties page:
Click Edit Account Properties on the Summary tab and edit the account properties if needed.
To save your changes on the Account Properties page, click Apply Changes at the bottom of the page.
To set or change your primary contact:
One person in your group needs to act as the point person for your account. This person will be your Billing Account Contact. Type the email address of your primary contact in the Billing Contact Email Address box.
To select your time zone:
While you're on the Manage Billing Account page, you can change your account's time zone, if necessary. Quickbase time zones are automatically set to Pacific Standard Time. If you live and work in a different time zone, just go to the Timezone list and select the correct zone.
To grant the ability to create public applications:
Note: This functionality is not available to accounts on the Quickbase Essential plan.
Do you want to let application managers in your account open their applications to everyone on the Internet? Quickbase features the power to make applications public. This is handy if you want to share some information with all the world. It's also useful to gather information from people who aren't Quickbase users. Many app developers use this feature to let the general public submit information, but still block them from viewing any information. This setup is commonly used for surveys or to gather requests. It's handy when you're not sure who'll want to enter data. The ability to create public applications is turned off when you first open an account. To allow app managers to create public applications, select the Allow Public Apps checkbox.
FAQ - Can members of the Quickbase Care team access my data?
No. Quickbase staff members can access only your basic account information to help you manage your account. They cannot see any data in your account's applications unless you explicitly grant them access.
More about the Manage Billing Account page
While you're here, take a tour of the other features. Before your applications start getting traffic, you'll want to learn some fundamentals, like how to track usage and manage your account limits. Summarized below are basic account management responsibilities which you can fulfill using the various tabs here on the Manage Billing Account page.
View account usage to stay within your plan limits
View account usage. The right side of the Summary tab's Account Info section shows you how much of your allocated space and user quota you're consuming.
View application usage. Is one of your application managers using up all your space? Confirm your suspicions on the Apps tab. Each application appears listed along with its usage statistics. See how many users and tables each one has. Also view the space each application takes up and see who the manager is.
FAQ - What happens if I go over my limits?
That depends on what limit you cross. If you exceed the number of users you've purchased, Quickbase emails you until you fix the problem by removing some users or purchasing an additional user pack. But, if you exceed your file attachment space or hit the size limit for an individual table, we'll stop you in your tracks. You won't be able to add any more data until you clean house or upgrade your account. See Managing an application's file attachments for more information.
Upgrade your plan
The Summary tab's Account Info section shows your plan and other account information, including a usage summary. To see details of the plan, click the name of the plan. When it's time to upgrade, you can use the Change plan link on the left to change your service plan. You can pay by credit card, or by invoice/purchase order if you sign up for an annual plan.
Remember that an annual plan is a year-long commitment. Should you cancel your account, you will not get a refund for the remaining part of the year.
Set billing account permissions
From the Permissions tab you can:
Grant or revoke the power to create applications – You control who can create applications within your account. Read how.
Change or add billing account administrators – Use the controls on this page to get help with your account's administrative tasks or to pass them on to someone else. You can grant varying degrees of permissions to billing account controls. Learn more.
Monitor and control user access
What is a user? A user is an individual who has access to a Quickbase application. A user is also an individual who has access to a Quickbase account. How do these two user roles relate to one another?
If a user has been given access to an application, they are automatically a user within the billing account the app belongs to. Only an App Manager can add a user to an application and control their role within that application. However, once that assignment has taken place, the Billing Account Administrator can control some of the user's permissions within the corresponding billing account.
From the Users with Access tab you can:
View details on all users with access to applications in your account – The Users with Access tab lists your users' names, user names, email addresses and user status.
See what applications a user can access – Locate the user you want to know about and click the apps link next to their name. Quickbase shows you every application they can access.
Remove a user's access to your account – You can deny any user access to your account. For example, if an employee has left your firm, you don’t need to remove her from every application in your account. Just cut her off from all of them in one fell swoop by denying access to your account.
Export a list of users with access. Read how.
Register your email domain
If you want, you can register your email domain with Quickbase. Registering your company's email domain allows you to find Quickbase users in your company more quickly. And, if you register your domain, you can grant create application permissions to everyone in your company. Learn more about registering your email domain with Quickbase.
Work with groups
The Groups tab is probably one you'll want to return to later, when you have a better idea of who'll be accessing applications in your account and how you want to grant them access. A group is a collection of registered Quickbase users to which you give a name. Any user who has the power to create an application, can create a group.
Why would you create groups? Groups can help you manage your account or application very efficiently. When you create a group, you can gather similar users together and grant application access or special permission rights to all members at once. For example, say you frequently share applications with all twenty people in your sales department. Sure, you can share with them one by one, but why not save yourself a lot of time and effort by gathering them all together in a group? That way, you can share an application once with the "sales" group, instead of selecting twenty users and sharing with each one.
An added benefit of groups is that you can use them to control access
permissions within an application. (This functionality is not available to accounts on the Quickbase Essential plan.) Normally, you control permissions
by assigning a  role to a user. This role
determines what the user can see or do. Save yourself loads of time by
assigning a role to an entire group. Whatever restrictions come with the
role then apply to each member. For example, say you've created an application
to manage your bow tie business. Sales needs to know what product line
they'll be offering this year, but you don't want them to see next year's
top secret, in-progress designs. (Will it be stripes or polka-dots?) You
could create a role that controls access in this way and assign it to
the "Sales" group. Likewise, you could create a "Design"
group for your firm designers and assign this group a role that forbids
access to sensitive sales commission information.
role to a user. This role
determines what the user can see or do. Save yourself loads of time by
assigning a role to an entire group. Whatever restrictions come with the
role then apply to each member. For example, say you've created an application
to manage your bow tie business. Sales needs to know what product line
they'll be offering this year, but you don't want them to see next year's
top secret, in-progress designs. (Will it be stripes or polka-dots?) You
could create a role that controls access in this way and assign it to
the "Sales" group. Likewise, you could create a "Design"
group for your firm designers and assign this group a role that forbids
access to sensitive sales commission information.
If you use groups to control access to your account and applications within it, they can even relieve you of the need to manually remove a user's application access or to deny or deactivate a user. For example, if you've granted a consultant access to your application by adding him to a group, you can remove thier access by deleting them from the group. If you're managing groups on the billing account level, this works the same way. Depending upon how you've structured your groups, removing a user from a group might take away thier access to all applications in your account, for example. In this situation, you should make sure that no application manager has granted them access as an individual user. To do so, after you remove the user from any and all groups, access the Manage Billing Account page and check the Users with Access tab.
Tip: As a Billing Account Administrator, you can assign a new user to a group, even before an application manager grants her access to information. This trick is called "provisioning" and it's a great way to ensure that a user has all the proper permissions in place, before they sees your data. (Read about provisioning users.)
Warning: Be careful when adding users! Whether you're provisioning a new user or inviting someone who never logged in to Quickbase to access your application, make sure you type the person's email address correctly. A typo results in a lost invitation and a bogus user account that you can't remove from Quickbase. If you've entered an incorrect email address, create an additional account using the correct email address. Even when you do so, there's a danger that others may mistake the bogus account with the real account (if they're very similar) and your user may miss invitations and alerts. If this confusion occurs, you must contact Quickbase Customer Care to resolve it.
Getting Help and Support
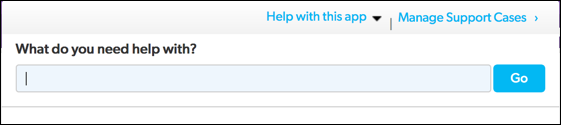
If you have a question or need help with your Quickbase application, help is just a click away. From the Quickbase Help dropdown, you can access:
Quickbase Help – A helpful search box searches across all Quickbase help resources (read more).
Quickbase Customer Care – Enter or update a case.
Quickbase Community – Your problem may have been solved before by another Quickbase customer. Explore the Quickbase Community where experienced developers and Quickbase staffers share tips and tricks. You can search for a solution or post your problem for discussion.
Custom App Guides – You can
write and post your own custom instructions for apps that you have administrative rights for that you want. Your users can access these guides from the application's Help
panel.
To create your own custom app guides:
Note: This functionality is not available to accounts on the Quickbase Essential plan.
Create your guide directly within Quickbase.
The guide is a Rich Text page that's part of your application.
From the app Home page, click Settings, then click App properties.
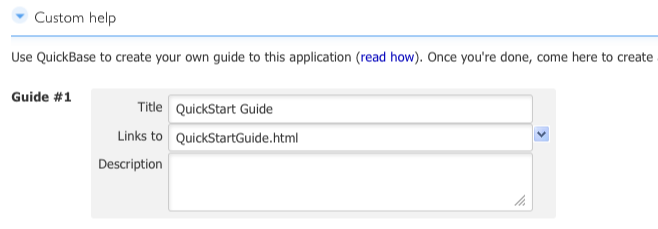
Click Branding & custom help then click Custom help to expand the section.
You can define up to three guides. For each one, enter a title and description, and pick a Rich Text page to link to.
Click Save on the Page bar to save your changes.
To view your changes, open an app, then click the ? (Help) icon on the Global bar. The guides for the app display in the Help with this app dropdown at the top of the panel. If the app only has one guide, the title and link to that guide displays instead of the Help with this app drop-down.